 ATTACKER-CODENINJA.GITHUB.IO
Claude Code Foundation
Before you can command the engine, you must first understand how it works.
Hello Everyone! 👋 Welcome back to Part 2 of the Mastering Claude Code Series.
In the first part of this series, we talked about the biggest trap most of us fall into: getting stuck in the “Builder” mindset and wasting hours fixing the AI’s mistakes instead of actually getting our work done.
We established our Golden Rule: We dictate the logic, and the AI simply executes it.
But here is the million-dollar question: How can you successfully dictate rules to a machine if you don’t even know how it processes your instructions? 🤔
You should never use an AI model blindly. Before putting it to work, you need to understand it properly - what it is, why it was built, how it was made, and exactly how it functions.
🎯 The Real Objective
To be clear, our goal here is NOT to learn academic definitions, memorize a list of tools, or write a research paper on AI limitations.
Our true goal is to understand Claude Code so intimately that we can use it smartly and efficiently for our own specific requirements. We want to focus on the actual work we want to get done, not on debugging the AI.
Think of the famous quote about chopping down a tree:
🪓 “Give me six hours to chop down a tree and I will spend the first four sharpening the axe.”
Understanding the AI model is exactly like sharpening your axe. Claude Code is going to be your work partner, your “digital friend”. If you are going to spend countless hours working with this friend, doesn’t it make sense to spend a little time understanding how they think first?
Once you understand your tool, you can cut down “multiple trees” (complete large projects) quickly and efficiently. 🌲⚡
Now, you might think, “Problems will always come up when coding.”
Yes, the problem-and-solution cycle is a never-ending loop. But if we proceed with the right foundational understanding, we can reduce that friction significantly.
That is why grasping the fundamental concepts of our AI “friend” is absolutely crucial.
Let’s start sharpening the axe! 🚀
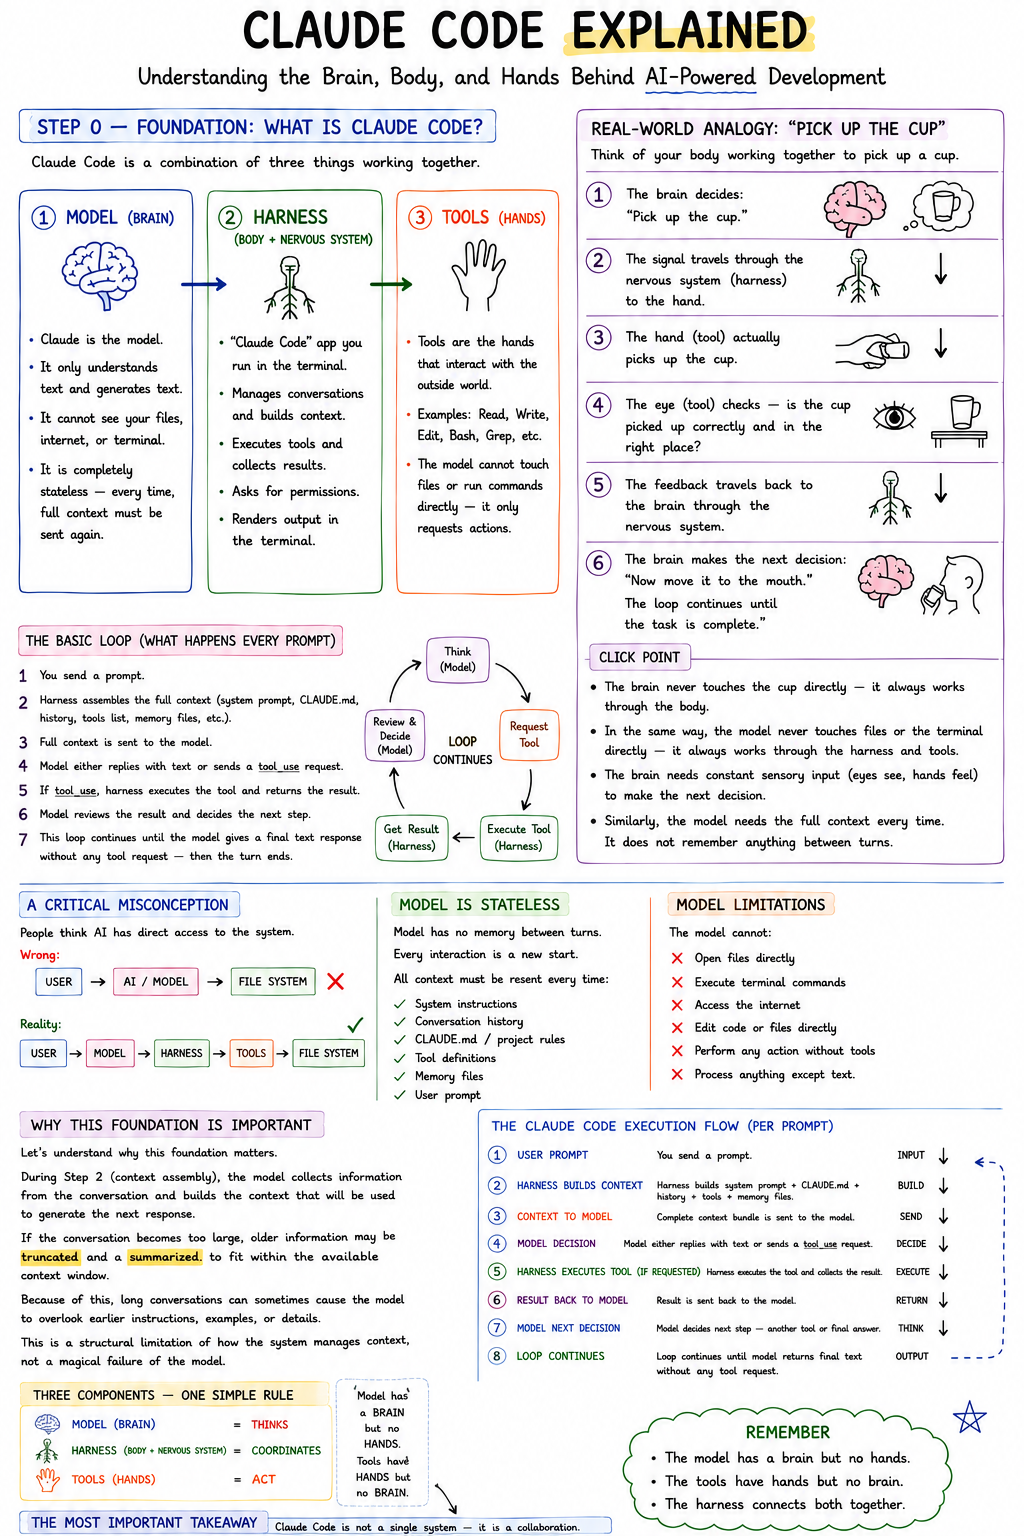
🧠 Claude Code Explained: The Brain, Body, and Hands
Many developers treat Claude Code as a single intelligent system. The workflow seems straightforward:
- You type a prompt.
- Claude reads it.
- Claude edits files.
- Claude runs commands.
- Claude fixes bugs.
From the outside, everything appears to happen inside one giant AI brain.
But that mental model is completely incorrect. 🛑
Understanding how Claude Code actually works is one of the most important concepts for developers, security engineers, researchers, and prompt engineers.
🚫 The Biggest Misconception
Most misunderstandings about AI tools come from one simple mistake:
People assume that the AI model itself can directly access their computer.
Let’s clear this up right now:
- ❌ The model never opens your files directly.
- ❌ The model never executes your terminal commands directly.
- ❌ The model never enters your project directory.
Instead, Claude Code operates through three separate layers that continuously communicate with one another.
🔍 Why Does This Matter?
Understanding these three separate layers immediately explains some of the most frustrating AI behaviors:
- Context Loss: Why AI sometimes forgets previous instructions.
- Inconsistency: Why long conversations become inconsistent over time.
- Permissions: Why explicit permissions are required before certain actions.
- Blind Spots: Why the AI occasionally misses parts of a long prompt.
- Context Management: Why managing the context window is one of the biggest challenges in AI-assisted development.
🏗️ The Three-Layer Architecture of Claude Code
To truly understand how this tool works, you have to stop thinking of Claude as one single entity. Think of Claude Code as three independent components working together.
🧠 Layer 1: The Model (The Brain)
The Model is Claude itself - the core LLM (Large Language Model) running in the cloud.
Its only real responsibility is reasoning. The Brain performs cognitive tasks such as:
- ✅ Understanding natural language.
- ✅ Interpreting your instructions.
- ✅ Making decisions and planning actions.
- ✅ Generating code and responses.
However, this Brain has severe physical limitations.
What the Model CANNOT do:
- ❌ Open your files.
- ❌ Browse your local directories.
- ❌ Execute terminal commands.
- ❌ Access the live internet.
- ❌ Edit code directly on your machine.
Crucial Concept: The model only processes text. It lives entirely in a text-based vacuum. Everything it “sees” from your computer must first be converted into plain text before the Brain can process it.
🧠 The Model is Stateless
Another highly critical concept to grasp is that the model is completely stateless.
What does “stateless” mean? It means the model has no built-in memory between requests. Every single time you hit Enter and send a prompt, it is essentially starting a completely new conversation from scratch.
Because it has no memory, all required information must be sent again for every single prompt. This massive data payload includes:
- System instructions
- Conversation history
- Tool definitions
- Project-specific instructions
- Memory files
- Your actual user prompt
Without all this information being packaged up and re-sent behind the scenes every single time, the model would know absolutely nothing about your previous interactions. 🤯
⚙️ Layer 2: The Harness (The Body and Nervous System)
If the Model is the brain, then the Harness is the body and nervous system.
The harness is the actual Claude Code application running locally inside your terminal. The crazy part? Most users interact with the harness every single day without even realizing it exists!
🛠️ What Does the Harness Do?
The harness is the unsung hero that bridges the gap between your local machine and the cloud-based Brain. It has four major responsibilities:
1. Context Management (The Nervous System) Before anything is sent to the brain, the harness collects and packages all available information. This includes:
- System prompts & Tool definitions
- Your user instructions
- Project instructions (
CLAUDE.mdfiles) - Previous conversation history
2. Permission Management (The Guardrails) Before any sensitive operations occur, the harness is the component that pauses and requests your explicit permission. For example:
- Editing or overwriting files
- Running terminal commands
- Accessing specific directories
3. Tool Execution (The Muscles) Here is a very important distinction: The model can only request to use a tool. The harness is what actually executes it on your local machine.
4. Response Rendering (The Face) After all the heavy lifting is done, the harness parses the data and displays the final, readable output inside your terminal.
Crucial Concept: Without the harness, the model would simply be an isolated text-generation system stuck in the cloud, completely unable to touch or see your codebase.
🖐️ Layer 3: The Tools (The Hands)
Tools are the specific mechanisms that allow the system to interact with the outside world.
Common tools include commands like:
ReadWriteEditBashGrep
Think of tools as the Hands. The Brain (Model) makes the decisions and provides the instructions, but the Hands (Tools) perform the actual physical work on your machine.
❌ A Critical Misconception: The Workflow
Many people believe that AI-assisted development looks like this:
User ➔ AI ➔ File System
That is completely incorrect. The actual flow of data looks like this:
User ➔ Model ➔ Harness ➔ Tool ➔ File System
The model is never directly connected to your computer. Every single action passes through an intermediary.
☕ The Ultimate Analogy: The Brain, the Body, and the Cup of Coffee
To tie this all together, let’s use a very simple human analogy.
The Mapping:
- The Model = The Brain: It thinks and makes decisions, but it cannot physically touch anything.
- The Harness = The Nervous System: It carries signals from the brain to the body, and brings sensory feedback from the body back to the brain.
- The Tools = The Hands & Eyes: They do the actual physical work (lifting, looking, writing) based on the brain’s orders, and “see” the result to send it back.
Example: Picking up a Cup of Coffee
- The Brain decides: “I want to pick up that cup.” (Model reasoning)
- The signal travels through the Nervous System. (Harness routing)
- The Hand actually picks up the cup. (Tool execution)
- The Eyes look at the hand to confirm: “Yes, the cup is in our hand, we haven’t dropped it.” (Tool feedback)
- This visual feedback travels back through the Nervous System to the Brain. (Harness sending context back)
- The Brain makes the next decision: “Now, bring it to the mouth.” And the loop continues.
🎯 The “Click” Point (Why this matters)
Your physical brain never touches a cup directly, it uses the body. In the exact same way, the AI model never touches a file or terminal directly, it uses the harness and tools.
Furthermore, just like your brain requires constant, real-time sensory input (eyes seeing, hands feeling) to know what is happening, the AI model is completely stateless and requires the entire context to be re-sent every single time. Without that continuous feed of sensory data, it is completely blind and has no memory of what it just did.
🏢 Another Perspective: The Remote Employee Analogy
If the biological analogy doesn’t click for you, try this real-world corporate analogy.
Imagine you just hired an extremely intelligent employee to work for you.
However, there is one strict restriction:
The employee is not allowed to enter the office.
Instead, they sit outside and communicate with the office entirely through an intercom.
Here is how the work actually gets done:
Step 1: The User Gives an Instruction You speak into the intercom: “Please analyze Project X.” The remote employee hears your request.
Step 2: The Employee Thinks (The Model) The employee analyzes the request and responds over the intercom: “Okay, but to do that, I need to read file XYZ.” Notice something important here: The employee does not open the file. They only request access to it.
Step 3: The Assistant Retrieves the File (The Harness/Tools) An office assistant (the Harness) hears the request over the intercom. The assistant walks to the filing cabinet, opens the file, and reads the contents back over the intercom to the remote employee.
Step 4: The Employee Reviews the Information After hearing the file’s contents, the employee analyzes it and says: “Got it. Please modify line 42 to fix the bug.” Again, the employee performs no direct physical action.
Step 5: The Assistant Performs the Edit The assistant in the office makes the edit to the document. The assistant then reads the modified document back to the employee so they can review the changes.
Step 6: The Cycle Continues This loop-request, retrieve, read, edit, confirm, repeats endlessly until the remote employee finally says: “The task is completely done.” Only then does the process stop.
Just like the remote employee, Claude Code is brilliant but physically locked out of your machine. It relies entirely on the “office assistant” (the Harness and Tools) to do all the physical moving, reading, and writing on its behalf.
🔄 The Claude Code Execution Loop
Every single prompt you send follows the exact same execution cycle. Let’s break it down:
Step 1: The User Sends a Prompt
- Example:
"Find all authentication vulnerabilities."
Step 2: The Harness Builds the Context The harness gathers everything it knows into a single context package:
- System instructions
CLAUDE.md- Conversation history
- Available tools
- Memory files
Step 3: The Complete Package Is Sent to the Model The model receives one massive text-based input. The model knows absolutely nothing outside of this package.
Step 4: The Model Makes a Decision Based on the package, the model chooses between two actions:
- Option 1: Respond directly. (e.g., “Here is the answer.”)
- Option 2: Request a tool. (e.g., “Use the Read tool.”)
Step 5: The Harness Executes the Tool If a tool is requested, the harness runs it on your machine.
- Example:
Read(auth.py)The results are then collected by the harness.
Step 6: The Results Are Sent Back to the Model The model examines the new information and decides what to do next. Perhaps another tool is required, a file must be edited, or a terminal command must be executed.
Step 7: The Loop Continues The cycle repeats endlessly in this specific order:
Think ➔ Request Tool ➔ Execute Tool ➔ Review Result ➔ Think Again
The loop stops only when the model determines it has enough information to produce a final answer without requesting additional tools.
🤷♂️ Why Does AI Sometimes Ignore Part of a Prompt?
This is where understanding context becomes extremely important.
Remember: The model is stateless. Every single interaction requires the harness to rebuild and resend the entire context package.
What Happens During Long Conversations? Over time, as you keep chatting, the context becomes larger and larger. Eventually, the harness faces hard technical limitations, such as:
- Context window constraints
- Token limits
- Performance optimizations
- Conversation summarization
💡 Good To Know: What is a Context Window? Think of a “Context Window” as the AI’s short-term memory capacity. Just like a human can only hold a certain amount of information in their active thoughts at one time, an AI model can only process a specific number of words (tokens) per request. If your ongoing conversation exceeds this size limit, the harness is literally forced to drop, forget, or compress older messages to make room for the new ones.
When these limits are hit, older information in your chat history may be truncated, compressed, or summarized by the harness before it is sent to the model.
This Explains a Common Developer Complaint:
“I already told the AI this three hours ago! Why did it forget?”
The answer is purely architectural. The AI did not forget in the human sense. The reality is that the relevant information was simply no longer present in the reconstructed context package sent by the harness.
🏆 The Most Important Takeaway
Claude Code is not one single system. It is a seamless collaboration between three separate systems:
| Component | Role |
|---|---|
| Model | Thinks |
| Harness | Coordinates |
| Tools | Act |
Remember this simple rule:
The model has a brain but no hands. The tools have hands but no brain. The harness connects them both together.
Once you understand this architecture, many of the “mysterious” behaviors of AI-assisted development suddenly become entirely predictable.
And that understanding becomes the bedrock foundation for everything that comes next in this series, especially Context Management.
📝 TL;DR: The 3 Layers of Claude Code Summarized
To put everything into a quick summary:
- Model (The Brain): This is Claude itself. It only understands and generates text. It cannot see your file system, the internet, or the terminal directly. It is completely stateless, it remembers absolutely nothing, which is why the entire context must be sent anew every single time.
- Harness (The Body & Nervous System): This is the actual
claude-codeapplication running in your terminal. It acts as the full wrapper around the model. It manages the conversation, builds the context, collects tool results, asks you for permissions, and renders the final output on your screen. - Tools (The Hands): These are the specific mechanisms like
Read,Write,Bash,Edit, andGrep. The model cannot touch files itself, it can only request, “Run this tool with this input.” The harness is what actually executes that tool on your machine and hands the result back to the model.